 |
|||
|
|
|||
|
Page Title:
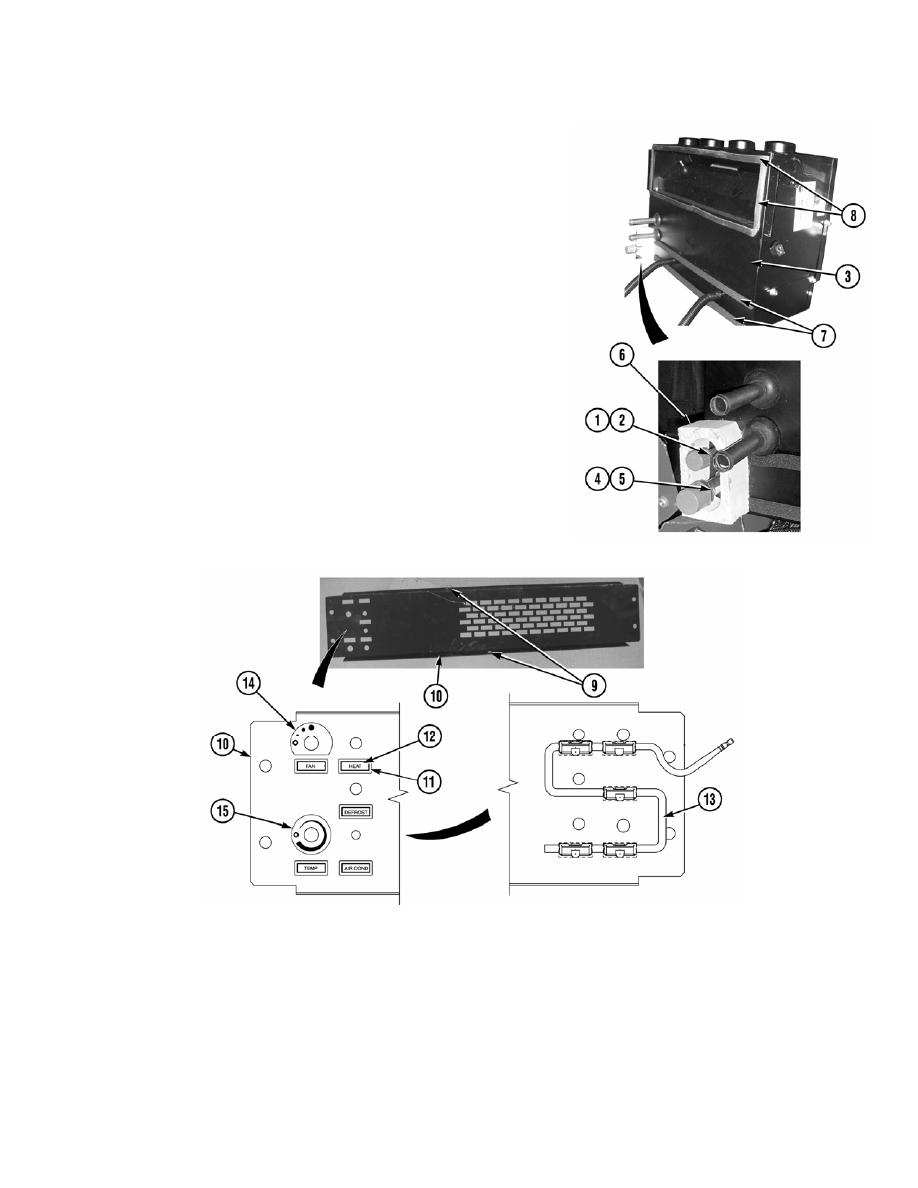
Heater/Evaporator Installation. |
|
||
| ||||||||||
|
|
 TB 9-2320-279-13-1
a.
Heater/Evaporator Installation.
1. Install preformed packing (1) and fitting (2) on
heater/evaporator (3). Torque fitting (2) to
11-13 ft-lbs. (15-18 Nm).
2.
Install preformed packing (4) and fitting (5) on
heater/evaporator (3). Torque fitting (5) to
18-22 ft-lbs. (24-30 Nm).
WARNING
Adhesives, solvents, and sealing compounds can burn easily, can
give off harmful vapors, and are harmful to skin and clothing. To
avoid injury or death, keep away from open fire and use in well-
ventilated area. If adhesive, solvent, or sealing compound gets on
skin or clothing, wash immediately with soap and water.
NOTE
Insulation is held to heater/evaporator using
3M adhesive.
3.
Apply 3M adhesive to insulation (6).
4.
Install insulation (6) on heater/evaporator (3).
5.
Install two PVC foam tape strips (7) on heater/evaporator (3).
6.
Install four PVC foam tape strips (8) on heater/evaporator (3).
7.
Install two nutserts (9) on heater center compartment cover (10).
8.
Install five bezels (11) on heater center compartment cover (10).
9.
Install five identification markers (12) on optic ribbon (13) in five bezels (11) on heater center
compartment cover (10).
10. Install fan label (14) on heater center compartment cover (10).
11. Install A/C temperature label (15) on heater center compartment cover (10).
0052-30
|
|
Privacy Statement - Press Release - Copyright Information. - Contact Us |
