|
| |
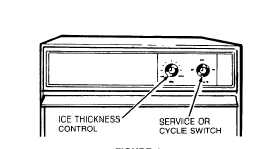
To Operate the Ice Maker:
1.
Select ice thickness (Figure 1). The ice maker
has been pre-set to produce ice approximately 1/2" thick,
while operating in a room ambient of 70°F (21°C).
Operation in different ambient temperatures may require
readjusting the control toward "THICK" or "THIN."
Best operation will be obtained with ice 1/2" to 5/8" thick.
If operating in a warm room ambient (above 90°F (32°C)
DO NOT set control to maximum thickness or the unit may
malfunction.
2.
To start the normal ice making cycle, turn service
or cycle switch to "ON."
FIGURE 1
3.
To stop ice maker operation, turn service or cycle
switch to "OFF."
4.
The "CLEAN" setting is used whenever solutions
are circulated through the ice maker for cleaning. Only the
water pump operates at this setting.
GENERAL CARE AND CLEANING
Periodically inspect and clean the ice maker to keep in
operating at peak efficiency and to prevent premature
failure of system components.
Both the ice making system and the air cooled condenser
need to be cleaned regularly.
Cleaning exterior surfaces:
Wash the exterior enamel surfaces and gaskets with warm
water and mild soap or detergent. Rinse and dry. Regular
use of a good household appliance cleaner and was will
help protect the finish.
NOTE: Do not use harsh or abrasive cleaners on
enamel surfaces as they may scratch the finish.
Cleaning the condenser:
A dirty or clogged condenser:
•
prevents proper air flow.
•
reduces ice making capacity.
•
causes higher than recommended operating
temperatures which may lead to component failure.
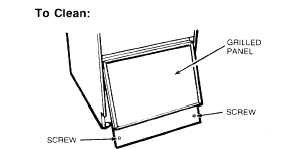
FIGURE 2
1.
Disconnect electrical power supply to the machine
or place the service switch in the "OFF" position. The
condenser fan should not operate while removing dirt from
the condenser.
2.
Remove the two screws from the bottom of the
grilled front panel. (Figure 2)
CAUTION: Switch must be in "OFF" position to keep
condenser fan from rotating. Do not touch condenser
fins. They are sharp. Refrigerant tubing gets very hot
during normal operation. Be careful.
3.
Pull forward and down to remove the panel.
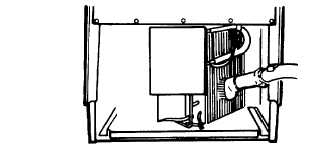
4.
Remove dirt and lint from the condenser fins with
a soft brush and then use a vacuum cleaner to remove the
dirt from the unit compartment (Figure 3).
CAUTION: Condenser fins are sharp and can bend
easily. Use care when brushing the condenser to
keep from bending the fins. Condenser tubing gets
hot enough during normal operation to burn your
hand. Use care and do not touch the tubing.
5.
Replace the grilled front panel and screws.
FIGURE 3
3
|