 |
|||
|
|
|||
|
Page Title:
Section VI. CRANKSHAFT & BEARINGS |
|
||
| ||||||||||
|
|
 TM 5-4110-217-14
Section VI. CRANKSHAFT & BEARINGS
5-24. General.
Removal of the camshaft or crankshaft bearings requires
complete disassembly of the engine. This would include
the removal of all accessories and assemblies covered
in previous removal paragraphs in Chapter 5, Sections I
thru V. This repair would also cover the inspection,
repair or replacement of the crankshaft, camshaft and oil
seals.
5-25. Crankshaft and Bearings.
a. Removal (fig. 3-11).
(1) Remove engine accessories and other
major assemblies and components described in
(2) Refer to paragraph 5-22 (3) for crankshaft
(199) removal. Remove crankshaft from crankcase at
end opposite flywheel end. Label piston parts to assure
proper reassembly.
(3) Use a press or a suitable drive plug to
remove crankshaft bearings (117A) and camshaft
Figure 5-25. Installation of Camshaft and Crankshaft
plate (117).
Bearings (Model RMP-J/I-l OG)
CAUTION
Support the casting to avoid distortion
lubricating hole (front only) in proper position. Be sure to
and avoid damaging the bearing bore
start the bearing straight. Press the front camshaft
during removal and installation.
bearing in flush with the outside end of the bearing bore.
(3) Press the rear camshaft bearing in until
b. Cleaning and Inspection.
past the ignition plunger hole.
(1) Clean all parts in approved cleaning
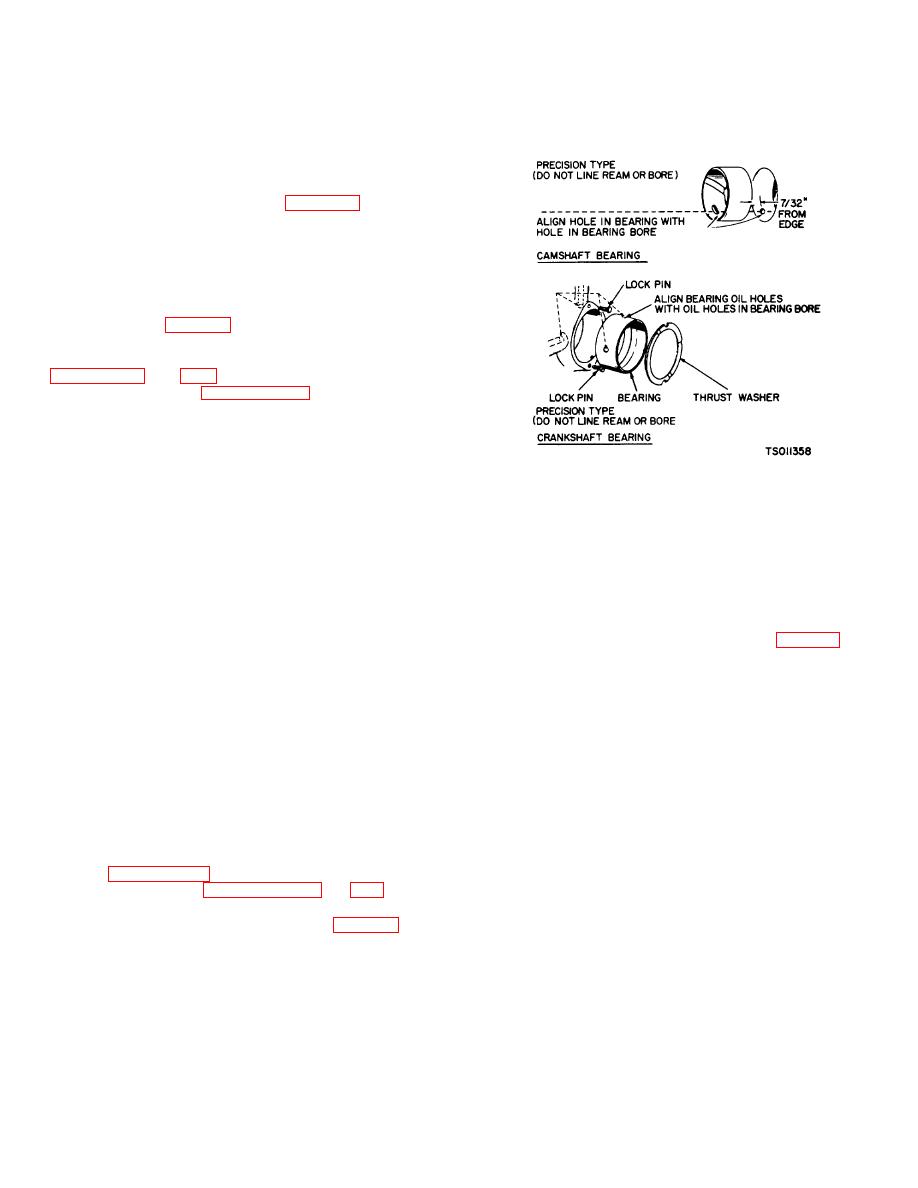
d. Installation of Crankshaft Bearings (fig. 5-25).
solvent. Blow out all oil passages. Dry parts thoroughly
(1) New crankshaft main bearings (117A) are
with clean, lint-free cloth.
precision type which do not require line reaming or line
(2) Inspect crankshaft, camshaft, bearings and
boring after installation
oil seals for cracks, chips, burrs, worn condition, and
CAUTION
other defects (3) Inspect crankshaft and camshaft
Support the casting to avoid distortion
bearing journals for scoring. Inspect the drilled passages
and avoid damaging the bearing bore
of the crankshaft for dirt or foreign material. Clean
during installation.
Use oil on the
passages to assure proper lubrication of the connecting
bearings to reduce friction when
rods.
installing and after installation.
(4) Remove crankshaft or camshaft burrs with
(2) Before putting in the main crankshaft
fine whetstone.
Replace or repair crankshaft or
bearings (117A), expand the bearing bore by
camshaft as necessary.
placing the casting in hot water or in an oven
(5) Replace defective bearings and oil seals.
heated to 200F. If practical, cool the precision
Refer to paragraph 1-5 tabulated data for tolerances and
bearing to shrink it.
clearances. Refer to paragraph 5-26 and 5-27 for oil
CAUTION
seal replacement.
If a torch is used, to prevent warpage,
c. Installation of Camshaft Bearings (fig. 5-25).
apply only a little heat.
(1) Replacement camshaft bearings are
precision type which do not require line reaming or line
(3) For putting in either the front or rear main
boring after installation. Coat the bearing with lubricating
bearing, always align the oil hole(s) in the bearing with
oil to reduce friction prior to assembly.
the oil hole(s) in the bearing bore. The oil passage must
(2) Place the camshaft bearing (209) on the
be at least 1/2 open. The cold oiled
crankcase (194) over the bearing bore with the
.
5-15
|
|
Privacy Statement - Press Release - Copyright Information. - Contact Us |
