|
| |
Note. The new compressor should not be used for
pulling a vacuum. Pull a high vacuum (less than 500 microns)
for several hours. Allow the system to stand several hours to be
sure the vacuum is maintained.
6-6. Evaporator and Condenser Coils
a. Inspection. Inspect coils for damaged tubing
and bent fins. Inspect threaded holes for damaged
or stripped threads.
b. Repair. Repair any leaks. Straighten bent fins.
Repair or replace damaged tubing if possible.
Replace coil if repair is not practical.
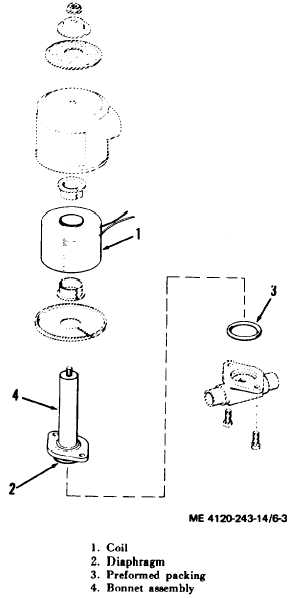
6-7. Solenoid Valves
a. General. The solenoid valves without electrical
connectors are identical. Replaceable parts are the
coil, bonnet assembly, diaphragm and the
preformed packing. See figure 6-3.
Figure 6-3. Solenoid valve, exploded view.
b. Coil Replacement. Replace coil as follows:
(1) Remove electrical connector from solenoid
valve leads.
(2) Remove nut on top of valve housing. Lift
housing and coil assembly from bonnet assembly.
(3) Remove coil from housing.
(4) Install coil bottom plate with edge upward.
(5) Install lower coil sleeve with flange at
bottom. Install coil with lead exits at bottom.
(6) Install coil spring with flat edges upward
and upper coil sleeve with flange at top. Sleeve
passes through the coil spring.
(7) Install coil housing, data plate and nut.
c.
B o n n e t A s s e m b l y a n d D i a p h r a gm
Replacement. Replace parts as follows:
(1) To replace diaphragm (2, fig. 6-3), remove
two screws from body flanges and lift housing, coil
and bonnet assembly (4) from body. Lift out
diaphragm.
(2) To replace bonnet assembly, remove coil
housing and coil ( b above) from bonnet assembly.
(3) Assemble coil and bonnet assembly. Install
diaphragm and preformed packing (3) on body.
Install coil and bonnet assembly and secure with
two screws.
6-7
|