|
| |
TM 5-4120-361-14
exchangers.
Frequent cleaning of the
external coil surfaces may avoid inter-
nal clogging.
Clean external surfaces
with a softbristled brush or a plastic
fin comb.
The plastic fin comb can be
used to straighten bent coil fins.
Clean internally-clogged coils with com-
pressed air.
Always direct the com-
pressed air stream straight into coils,
to avoid bending fins, and in the oppo-
site direction of normal air flow. Re-
move covers and louvers (figure 4-1, 4-3
and 4-4) to service coils.
4-6.
Top Covers and Condenser Cover.
a.
Removal.
—
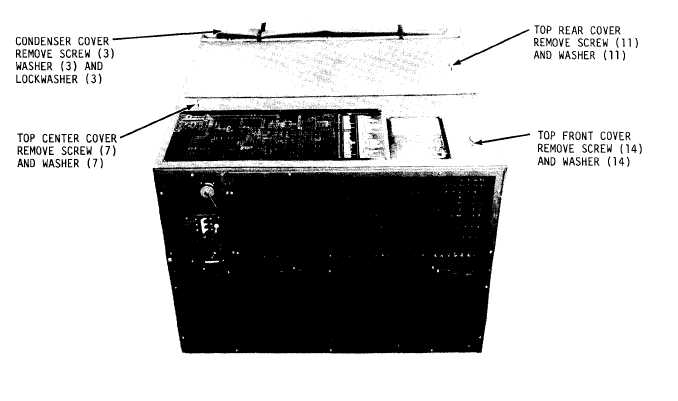
(1) Refer to figure 4-4 and remove
top front cover.
Remove this cover
first as it provides access to one screw
of the center cover that is not visible
from the outside.
(2) Remove condenser cover and top
rear cover.
(3) Remove top center cover.
b.
Inspection and Repair.
Inspect
condenser fabric cover for tears.
Re-
pair minor tears with waterproof tape.
Inspect top covers for dents, breaks,
chipped paint and damaged gaskets or in-
sulation.
Inspect for minor dents in
top covers and make sure that covers are
installed flush with mating surfaces of
the housing.
If top covers cannot be
repaired, install replacement covers.
c.
Installation.
Refer to figure
4-4 and install top covers and condenser
cover as follows:
(1) Install top center cover.
(2) Install top rear cover and con-
denser cover.
(3) Install top front cover.
4-7.
Evaporator Inlet and Outlet Lou-
vers.
a.
Removal.
Refer to figure 4-1 and
remove evaporator inlet and outlet lou-
vers.
Figure 4-4.
Top covers and condenser cover, removal and installation
4-4
|