|
| |
TM 5-4120-377-14
b. Inspection
(1)
(2)
(3)
(4)
Check that panel is not bent, cracked, or punctured.
Check that gasket is not torn, loose, or missing.
Check that information is readable.
Refer all repairs to direct support maintenance.
c. Installation
(1) Aline captive studs with casing fasteners.
(2) Using screwdriver, secure access panel with two captive turnlock fastener studs.
Follow-on procedure: Connect power.
4-31. FILTER (RADIO FREQUENCY) MOUNTING PLATE
Disconnect input power to air conditioner before performing any internal maintenance,
Voltages used
Preliminary procedure:
can KILL. Shutting unit off at control panel does not disconnect unit power.
Turn unit power off at power source. If there is a chance that it will be turned on, also
disconnect power cable to air conditioner.
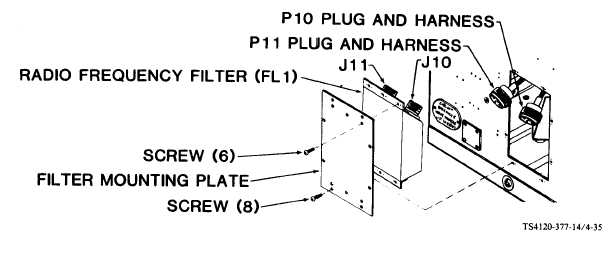
Figure 4-35. Filter Mounting Plate
a. Removal
(1) Using screwdriver, remove eight outermost screws from filter mounting plate.
(2) Slip plate and filter out and support filter.
(3)
(4)
4-64
Using screwdriver, remove six screws from mounting plate and filter.
Remove mounting plate.
|