Order this information in Print

Order this information on CD-ROM

Download in PDF Format


Click here to make tpub.com your Home Page

Page Title: Compressor replacement (cont)
Back | Up | Next

Click here for a printable version

Google


Web
www.tpub.com

Home


Information Categories
.... Administration
Advancement
Aerographer
Automotive
Aviation
Combat
Construction
Diving
Draftsman
Engineering
Electronics
Food and Cooking
Math
Medical
Music
Nuclear Fundamentals
Photography
Religion
USMC
   
Products
  Educational CD-ROM's
Printed Manuals
Downloadable Books


TM5-4120-377-14 (4)  Unwrap  the  insulation  from  the  suction  tube  so  that  the  joint  on  the  compressor  is  exposed. (5)  Discharge  the  refrigerant  system  per  paragraph  5-6. (6)  While  purging  the  system  with  nitrogen,  debraze  the  tubing.  (See  para  5-7  and  5-8.) 
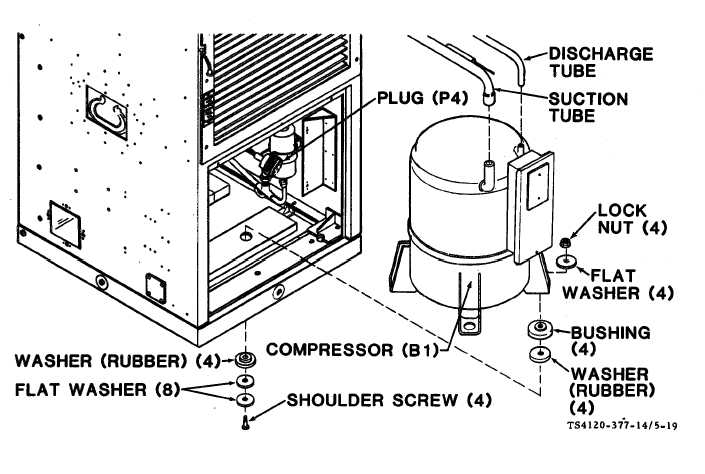
(7) Using wrenches, remove four lock nuts and flatwashers from top of mounting feet and fourshoulder bolts, eight  flat  washers,  and  four  rubber  washers  from  underneath  side  of  unit. Figure   5-19.   Compressor   (B1) (8)  Lever  or  tilt  the  compressor  and  remove  rubber  washer  and  bushing  from  under  each  of  the  four mounting  feet. If   compressor   burn   out   is   suspected,   use   care   when   handling   compressor   to   avoid touching  compressor  sludge,  Acid  in  sludge  can  cause  burns. (9)  Carefully  slide  compressor  from  air  conditioner. (10)  Check  the  compressor  to  see  if  a  motor  burn  out  is  indicated. 5-39

Privacy Statement - Press Release - Copyright Information. - Contact Us - Support Integrated Publishing

Integrated Publishing, Inc. - A (SDVOSB) Service Disabled Veteran Owned Small Business