 |
|||
|
|
|||
|
|
|||
| ||||||||||
|
|
 TM 5-4120-393-14
4-52. Rectifier (CR) (cont)
INSPECTION/TESTING
1.
Check that wire leads are properly connected to rectifier and are not damaged. See wiring diagram, para 4-13.
2.
If rectifier is suspected bad, tag and remove rectifier leads.
3.
Use a continuity tester or a multimeter set on the lowest OHMS scale to test for continuity between each of the four
rectifier terminals and the mounting plate. If continuity is found between any rectifier terminal and the mounting plate,
replace the rectifier.
4.
Use a multimeter set on lowest OHMS scale to test resistance across rectifier bridge in accordance with the following
table. If resistance is different from that indicated in table, replace rectifier.
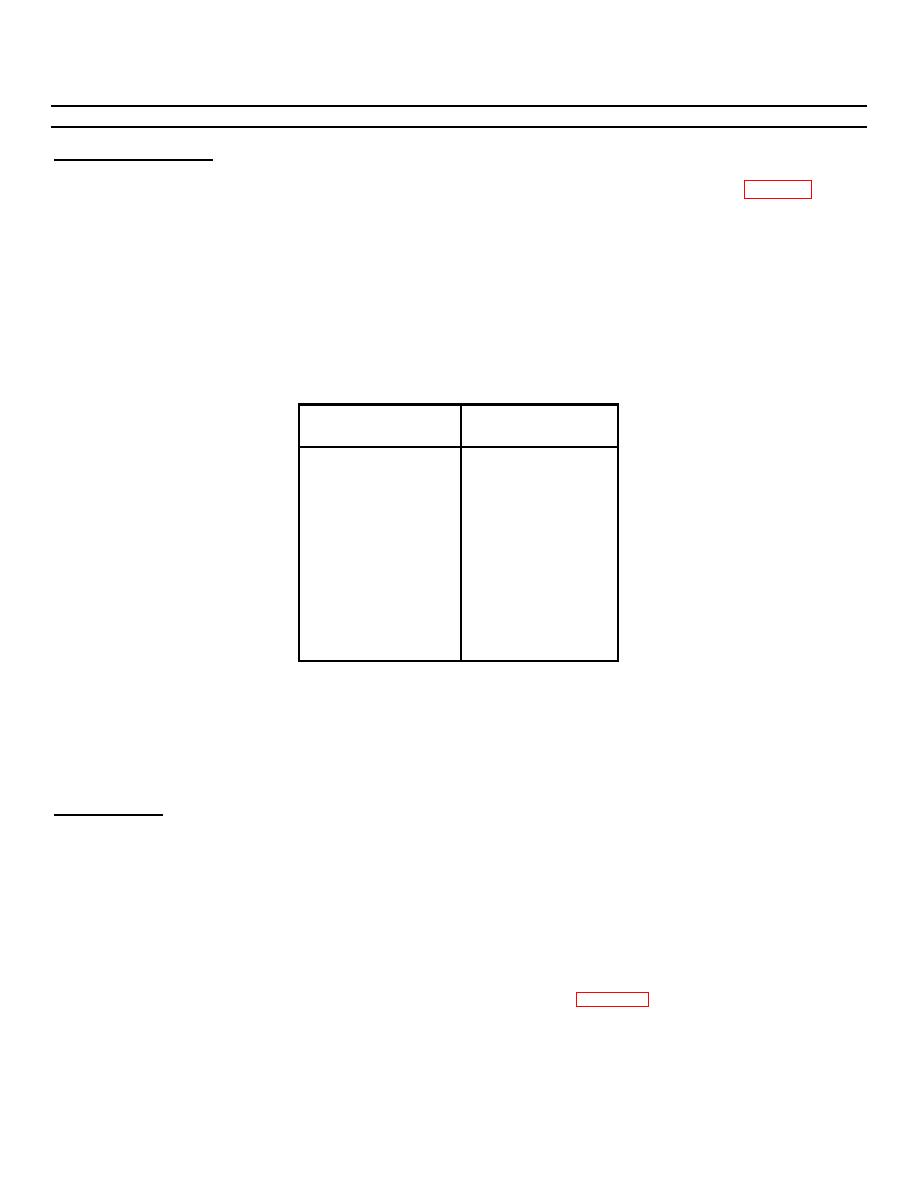
Table 4-4. Rectifier Test
Meter Lead
Resistance
Neg
Pos
Term.
1
Term.
2
20 ohms or less
Term.
1
Term.
3
1000 ohms or more
Term.
2
Term.
1
1000 ohms or more
Term.
2
Term.
4
1000 ohms or more
Term.
4
Term.
2
20 ohms or less
Term.
4
Term.
3
1000 ohms or more
Term.
3
Term.
1
20 ohms or less
Term.
3
Term.
4
20 ohms or less
Term.
1
Term.
4
1000 ohms or more
Term.
4
Term.
1
1000 ohms or more
Term.
2
Term.
3
1000 ohms or more
Term.
3
Term.
2
80 ohms or less
NOTE
A diode bridge will sometimes act differently under a power test than resistance
tests indicate. To perform a power test, apply 28 volts ac across terminals 1 and 4
to test output voltage. The meter should read 24 5 volts do across terminals 2
and 3. If output voltage is not within limits, replace rectifier.
INSTALLATION
1.
Insert rectifier (5) mounting stud through hole in rectifier bracket and secure with nut (3) and lock washer (4).
2.
Replace leads and remove tags.
3.
Using screwdriver, install cover (2) with eight screws (1).
NOTE
FOLLOW ON MAINTENANCE:
1. Install junction box number two. See para 4-46.
2. Connect power.
4-122
|
|
Privacy Statement - Press Release - Copyright Information. - Contact Us |
|
|
Integrated Publishing, Inc. - A (SDVOSB) Service Disabled Veteran Owned Small Business
|

