|
| |
ARMY TM 9-4120-381-14
NAVY EE-000-CA-MMA-010/7053-AC
AIR FORCE TO 35E9-136-31
Table 5-1. Direct Support Troubleshooting - Continued
MALFUNCTION
TEST OR INSPECTION
CORRECTIVE ACTION
14. MOTOR BURNOUT.
Check control box for welded starter contacts, welded overload contacts or burned out heater elements.
a.
Replace crankcase heater (para 4-81), if defective.
b.
Replace terminal plate (para 5-51), if defective.
c.
Replace current overloads K23 and K24 (para 5-52), if defective.
NOTE
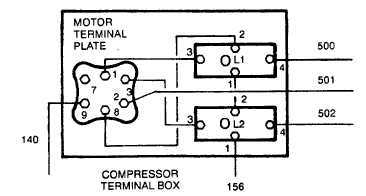
For steps d, e, and f, tag and remove all wires from terminal plate.
d.
Check thermal overload (S15) for continuity. Using multimeter, measure across terminals 8 and 9 for
continuity. Replace compressor (para 5-46) if continuity is not indicated.
e.
Check motor windings for short to ground. Using multimeter, measure from each terminal (1, 2, and 3) on
terminal plate (para 5-51) to ground. Replace compressor (para 5-46) if any measurement has continuity.
f.
Check motor windings resistance. Using multimeter, measure across terminalsl-2, 2-3, and 1-3 (para 5-51)
for less than 10 ohms. If any measurement is greater than 10 ohms, replace compressor (para 5-46).
15. COMPRESSOR RUNNING HOT.
Step 1. Blown valve plate head gasket.
Replace gasket (para 5-47), if defective.
Step 2. Broken suction or discharge valve.
Replace valves and valve plate (para 5-47), if defective.
Step 3. Compression ratio too high.
a.
Check setting of high (para 5-23) and low (para 5-24) pressure switches.
b.
Clean condenser coil (para 4-90).
c.
Check that evaporator motor (para 4-70) and condenser motor (para 4-76) are operating properly.
5-7
|