|
| |
TM5-4120-377-14
NOTE
If all of the above inspections and tests are satisfactory, but the motor will still not operate
properly, notify direct support maintenance, who may desire to make further tests before
the motor is removed.
b. Fan inspection (Installed)
(1) Check fan for dents, bent or loose fan blades, and that hub is securely attached. Replace if damaged.
(2) Check inlet bells for dents or any distortion that would cause interference with fans. Replace if
damaged.
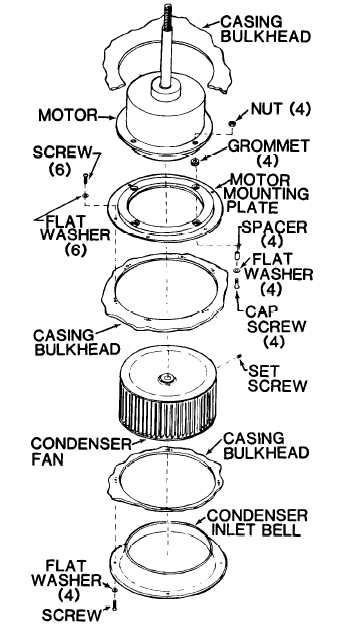
TS4120-377-14/4-76
Figure 4-76. Evaporator and Condenser
Fan Motor and Condenser Fan
c. Removal
(1) Using screwdriver and wrench, remove six
screws and lock nuts from handle and handle
enclosure on right side of unit.
(2) Remove handle and enclosure.
(3) Looking into condenser fan discharge
opening, rotate fan and locate the two setscrew
access notches through fan blades.
(4) Using special tool, 6 inch (15.2 cm) long
arm hex “L” type key (allen wrench), loosen two
setscrews until they are flush with outside of hub.
(5) Note position of motor junction box for
reassembly.
(6) Mark motor and motor mounting plate for
alinement at reassembly.
Take care that hardware does not drop
down into unit.
(7) Using screwdriver, remove six screws and
flat washers from motor mounting plate.
(8) Using wrench, remove four nuts from top of
motor mounting flange.
The following steps require two people.
(9) Lift motor high enough to gain access to
mounting plate hardware.
4-118
|