|
| |
TM 55-8145-221-14&P
Change 1
0030 00-2
AUXILIARY FUEL TANK MAINTENANCE – Continued
0030 00
DISASSEMBLY.
NOTE
Disassemble components only to the level required to perform repair.
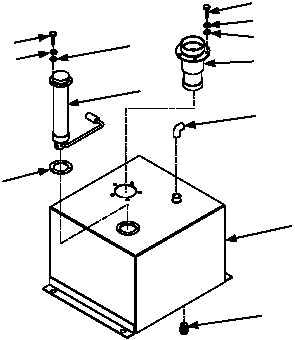
1. Remove elbow (1, Figure 2) from fuel tank (2).
2. Remove five screws (3), lock washers (4) and flat washers (5) from fuel gauge (6). Discard lock washers.
3. Carefully remove fuel gauge (6) and gasket (7) from fuel tank (2).
4. Remove six screws (8), lock washers (9), flat washers (10) and filler neck (11). Discard lock washers.
5. Remove drain plug (12).
CLEANING.
1. Remove sealant from fuel tank fill opening and filler neck (11).
__________
WARNING
To prevent injury to personnel and damage to equipment, use dry cleaning solvent only in
well-ventilated areas. Avoid repeated or prolonged contact with skin. Do not use near
sparks, open flame or excessive heat.
2. Clean components with dry cleaning solvent (Item 14, WP 0078 00) and wiping rag (Item 18, WP 0078 00). Pay close
attention to inside of tank.
3. Dry components with wiping rag (Item 18, WP 0078 00).
INSPECTION.
1. Inspect fuel tank (2, Figure 2) for cracks, punctures, and pinholes caused by corrosion.
2. Inspect elbow (1) and plug (12) for stripped threads or cracks.
3. Inspect fuel gauge (6) for cracks, deformed, or worn components.
Figure 2. Fuel Tank Disassembly
7
12
1
2
5
6
4
3
11
10
9
8
|