 |
|||
|
|
|||
|
Page Title:
AC HEATER/EVAPORATOR BLOWER OPERATES BUT NO COLD AIR FROM DUCTS DURING AC OPERATIONS - continued |
|
||
| ||||||||||
|
|
 DRAFT
TB 9-2320-364-13&P-1
AC HEATER/EVAPORATOR BLOWER OPERATES BUT NO COLD AIR FROM
DUCTS DURING AC OPERATIONS - Continued
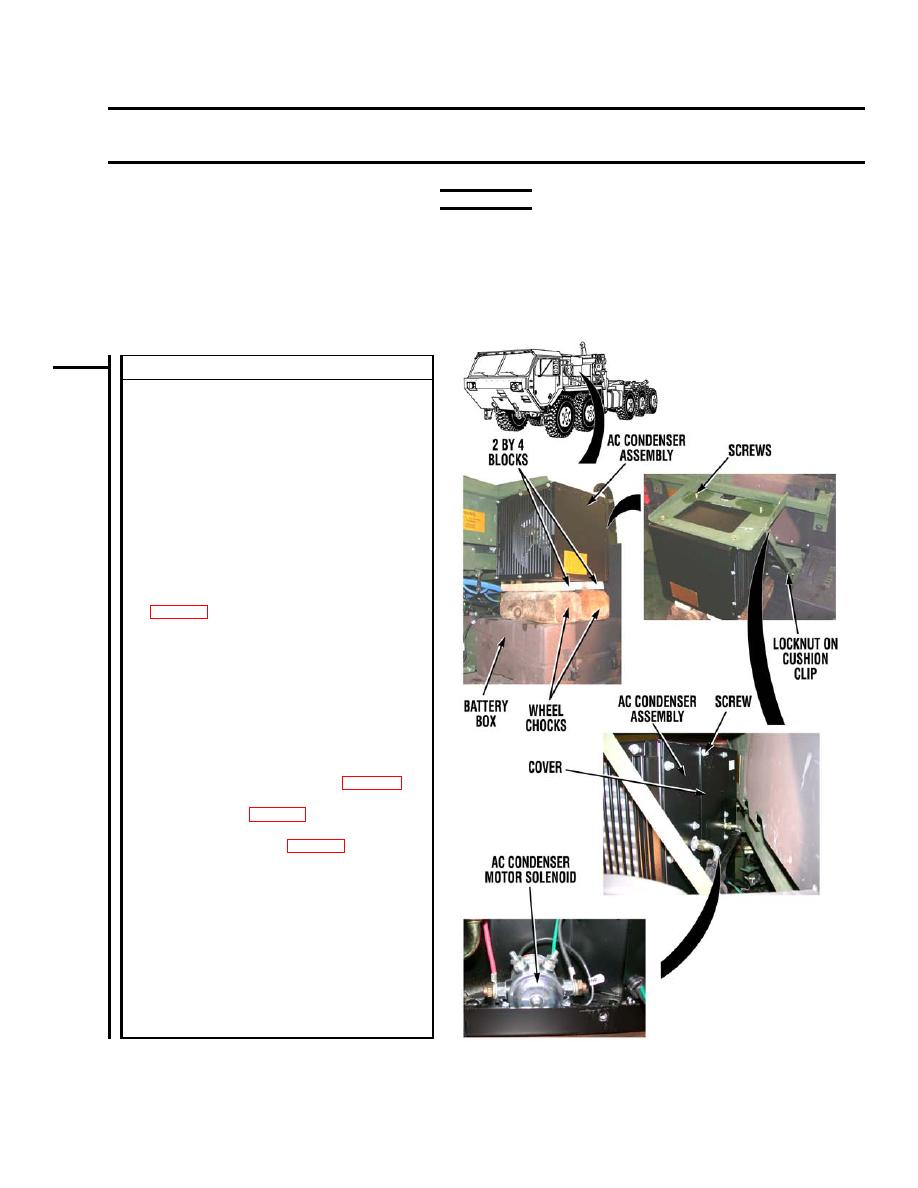
WARNING
Remove rings, bracelets, wristwatches, neck chains, and any other jewelry before working around
vehicle. Jewelry can catch on equipment and cause serious injury. Jewelry or tools may short
across electrical circuits or terminals and cause damage to equipment or severe burns or
electrical shock to personnel.
AC condenser assembly weighs 75 lbs. (34 kg). Do not lift AC condenser assembly without the aid
of an assistant. Failure to comply may result in injury to personnel and/or damage to equipment.
- - - - - - - - - - - - - - - - - - - - - - - - - - - - - - - - - - - - -
AUDIBLE TEST
NOTE: Wheel chocks and wooden blocks are placed
on top of battery box to aid in the removal of condenser.
NOTE: If wheel chocks are not available, use similar
size material to support condenser. Support needs to
be approximately 5.75 by 15.5 by 15.5 in.
(1) Turn engine switch OFF (TM 9-2320-364-10).
(2) Position two wheel chocks on top of battery box.
(3) Place two 2 by 4 by 16 in. wooden blocks on top of
wheel chocks.
(4) Loosen locknut on cushion clip.
NOTE: Do not loosen or disconnect AC hoses in
Step 5.
(5) With the aid of an assistant, remove four screws
and lower condenser assembly onto wooden blocks
NOTE: AC harness wire 1435 must be connected to AC
condenser assembly or system will not operate in
Step 12.
(6) If disconnected, connect AC harness wire 1435 to
AC condenser assembly.
(7) Connect AC harness AC condenser assembly
connector.
(8) Rotate AC condenser assembly to gain access to
cover on AC condenser assembly.
(9) Remove four screws, lockwashers, washers, and
cover from AC condenser assembly (WP 0026).
(10) Turn fan control switch to an on position (low,
medium, or high) (WP 0004).
(11) Turn temperature control switch to the coldest
position (fully clockwise) (WP 0004).
NOTE: Do not start engine in Step 12. AC condenser
motor solenoid operation will be checked by listening for
a clicking sound from the AC condenser motor solenoid
when the engine start switch is turned to ON position.
(12) While assistant turns engine start switch ON
(TM 9-2320-364-10), check operation of AC
condenser motor solenoid by listening for a click
when engine start switch is turned ON.
(a) If AC condenser motor solenoid is not
energized, go to Step 24 of this fault.
(b) If AC condenser motor solenoid is energized,
go to Step 20 of this fault.
PLSAC175
|
|
Privacy Statement - Press Release - Copyright Information. - Contact Us |
