|
| |
TM5-4310-377-14
(3) Disconnect wiring harness connector (P6) from (J6) on solenoid valve (L2) or connector (P5) from
connector (J5) on solenoid valve (L1).
(4) Remove coil and component parts. (See para 5-17.)
(5) Using wrench, remove plunger assembly from valve body. Remove O-ring, diaphragm and washer
from valve body.
(6) Check valve body for visible damage. Normally valve body replacement is unnecessary. If valve
body is in good condition, skip steps (7) through (9).
(7) Using screwdriver, remove two screws and lock washers that attach base of valve body to casing
side panel.
(8) Purge the system with nitrogen and debraze the tube connections. (See para 5-7 and 5-8.)
(9) Remove the valve body.
b. Installation. If valve body was not removed, go to step (3).
(1) Place the valve body on the tube ends, purge the system with nitrogen and braze the tube joints.
(See para 5-7 and 5-8.)
(2)
washers.
(3)
(4)
(5)
(6)
(7)
(8)
(9)
Using screwdriver, secure the valve body to the casing side panel with two screws and lock
Check internal surface of valve body to be sure it is clean.
Carefully install washer, diaphragm assembly and O-ring in valve body.
Using wrench, install plunger assembly in valve body.
Install coil and component parts. (See para 5-17.)
Reconnect connector and harness.
Replace dehydrator. (See para 5-13.)
Leak test all newly connected joints and those in the repair area. (See para 5-9.)
(10) Evacuate and charge the system. (See para 5-10 and 5-11.)
Follow on procedure: Install junction box. (See para 4-46.)
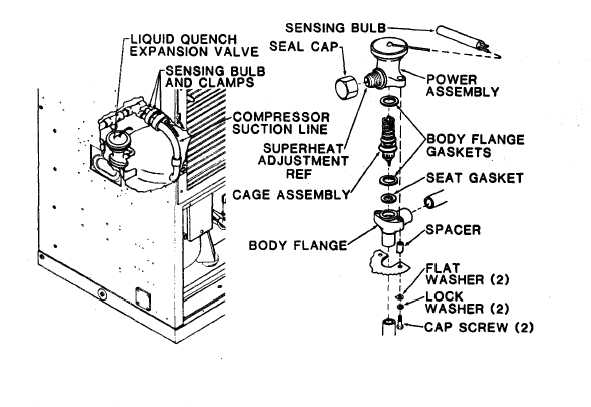
5-19. LIQUID QUENCH EXPANSION VALVE
Preliminary procedure: Remove the junction box. (See para 4-46.)
Figure 5-16. Liquid Quench Expansion Valve
Change 1
5-32.1/(5-32.2 blank)
|