|
| |
TM 5-4120-377-14
TABLE 4-2. TROUBLESHOOTING (Cont.)
MALFUNCTION
TEST OR INSPECTION
CORRECTIVE ACTION
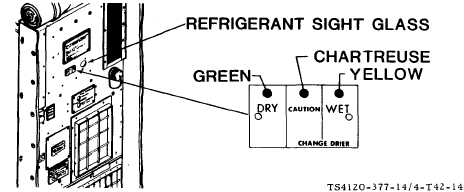
Step 6. With unit operating in COOL mode, check condition of refrigerant in sight glass.
a.
b.
c.
d.
If color is yellow or a Iight hue of chartreuse, or if numerous bubbles appear. turn air
conditioner-OFF, and contact direct support maintenance for refrigeration system servicing.
If color is green or a dark hue of chartreuse, but has a milky appearance, or more than an
occasional bubble appears, thoroughly clean the condenser intake screen, condenser fan
guard, condenser coil, and entire condenser section to remove all obstructions.
Clean and service, or replace mist eliminator. (See para 4-35.)
Clean evaporator coil and entire evaporator section. (See para 4-64.)
Step 7. Check air flow out of conditioned air (evaporator) discharge grille. If airflow volume is low:
a. Adjust conditioned air (evaporator) intake grille louvers.
b. Clean and service or replace conditioned air filter element. (See para 4-33.)
c. Clean and service, or replace mist eliminator. (See para 4-35.)
d. Clean evaporator coil and entire evaporator system. (See para 4-64.)
Step 8. Check CBR filter, if installed. (See para 2-21).
Clean, replace, or adjust as indicated.
Step 9. Check operation of Temperature control thermostat (S1).
a. Inspect sensing bulb and capillary for damage or leakage. (See para 4-39.) Replace entire
control if bulb is damaged or leaking.
b. Test switch in TEMPerature control thermostat. (See para 4-39.) Replace entire control if
defective.
4-46
|